Welcome to the Caido documentation! Here you will find a wealth of information on how to use Caido to perform web application security testing.
Explore our documentation to learn about the different features of Caido and how to install and configure it.
I am just starting
Great! Glad to have you on board 🚀
We suggest you head over to the Overviews and Tutorials to get familiar over the basics.
If you are facing an issue, look into Common Errors, it might have a clue. Otherwise feel free to join our Discord and ask for help 😊
I know my way around
You might want to dig into more advanced features we offer like HttpQL and running Caido on remote VPS.
Want a quick peak of the future?
FAQ
Is Caido free?
Caido has a free Basic plan. We also offer a Pro plan which includes additional advanced features. By purchasing the Pro plan, you will be supporting the development and maintenance of the tool.
Additionally, we offer a Team plan for organizations that need premium support and/or custom feature implementation.
You can check our website to stay informed about the new features that will be added in the future.
Is Caido open source?
Caido is not currently open source, but we have plans to offer an API for open source plugin development. We also employ standard open formats whenever possible.
On how many devices can I install Caido?
At this time, Caido can be installed on an unlimited number of devices. You are welcome to install Caido on as many devices as you like.
What data do you collect?
When you register for Caido, we collect your name and email address, as well as information about your user agent.
When you use Caido, we collect interaction data between your instances and our cloud services. This includes the IP address of the instance and API call actions/timestamps.
We do not collect any data stored on your instances nor interactions within the caido application.
Where can I ask for support and/or feature requests?
You can ask for support and submit feature requests through our public Discord or Github repository. Both are great places to share feedback and help improve Caido.
What is the difference between Caido CLI and Caido Desktop
The Caido CLI is self-contained binary that launches the Caido proxy (also called instance). You can use it on remote servers or locally and access the instance using your browser. The Caido Desktop acts a connection manager to your instances and can also launch the Caido proxy in the background. It uses webviews to access the instance instead of the browser.
WARNING: At the moment, Caido Desktop is considered experimental and does not perform as well as the browser on Linux.
I've encountered an error, what do I do?
There is 3 options available:
- Go check out the Common errors page
- Join the Discord
- Raise an issue on Github if it's a bug.
WARNING: At the moment, Caido Desktop is considered experimental and does not perform as well as the browser on Linux.
Common errors
You might face of any these issues while using Caido:
- "You do not have access to this instance"
- I have paid for "Pro" but it still shows "Community" in the app
- I get a "Date mismatch" error during login
"You do not have access to this instance"

You may encounter this error when trying to access an instance that you do not own (further info on instances here). This can happen if you've initially setup a Caido instance using a different account.
Method 1: Login with your original Caido account
Login to the initial account that was used to setup your Caido instance.
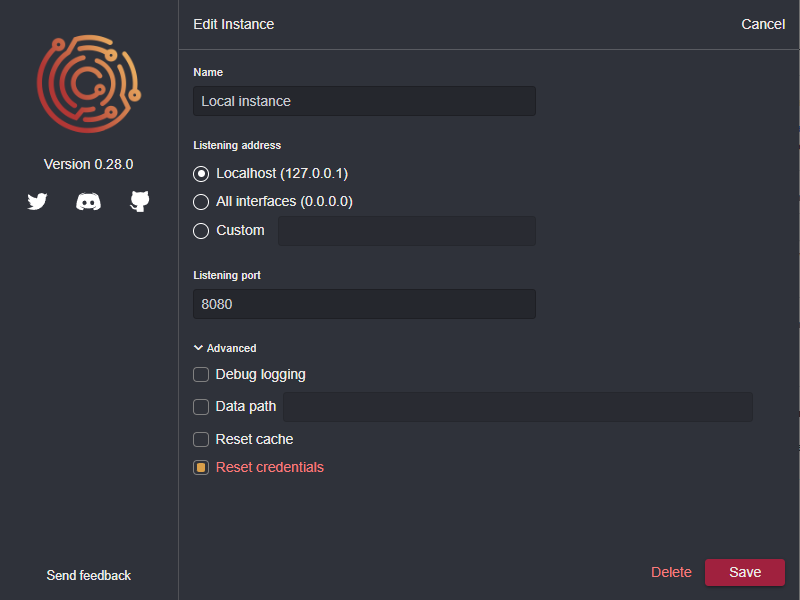
Method 2: Reset the instance credentials
If you're using the CLI, start Caido using caido --reset-credentials
If you're using the desktop app, check the Reset Credentials checkbox in your instance's advanced settings.
These settings will allow you to login with any account you want.
Once you've claimed your instance, make sure to remove the --reset-credentials option or checkbox, otherwise your instance credentials will be reset on every launch.
Method 3: Delete your data folder
While not ideal, deleting your Caido data folder will allow you to start with a fresh installation. Check out the Files page to locate your data folder.
"Login URL generation failed"
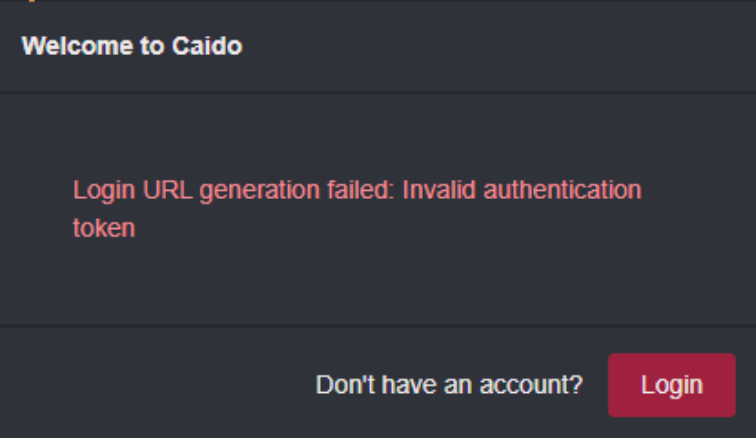
You may encounter this error when trying to access an instance that you deleted in the Caido dashboard.
The easiest way to fix this issue is to Reset the instance credentials.
I have paid for "Pro" but it still shows "Community" in the app
Caido caches the state of your account. Any changes to your account can take some time to update.
You can refresh your account state by logging out / logging in to your Caido instance.
I get a "Date mismatch" error during login
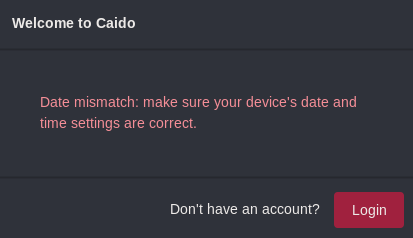
You may see this error during login, it means that your computer time is likely out of sync. Visit time.is to confirm it.
We allow 5 minutes slippage between the "real" time and your computer time. To fix it, you will have to manually resync the time using NTP.
Windows (details)
- Right-click on the clock
Adjust date/time- Go to
Date & TimeinSetting - Click
Sync now
MacOS (details)
- Open a terminal window
- Use the
sntpcommand with the-Soption to slew the clock (sudo sntp -S pool.ntp.org) - Check the time synchronization status again using the same command
Linux (details)
- Open a terminal or SSH into your server
- Install the NTP package:
sudo apt-get install ntp - Once the installation is complete, the NTP service should start automatically
- Check its status by using this command
sudo systemctl status ntp
Reporting a bug
Found a bug in Caido or need help debugging? You are at the right place!
We need a few items to be able to reproduce bugs and help you 🙂
1. Backend Logs
Caido is using a client/server architecture, that means that we need logs from two place.
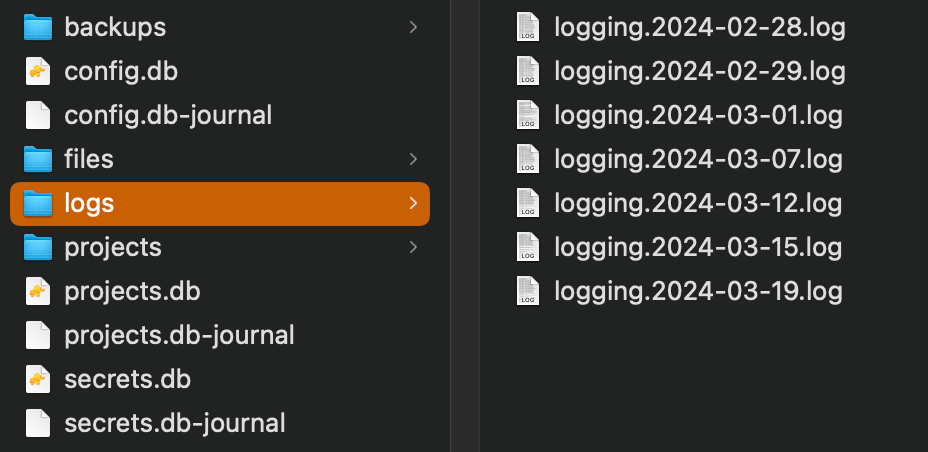
The first place to look for logs is in your data folder, you should see a logs folder.
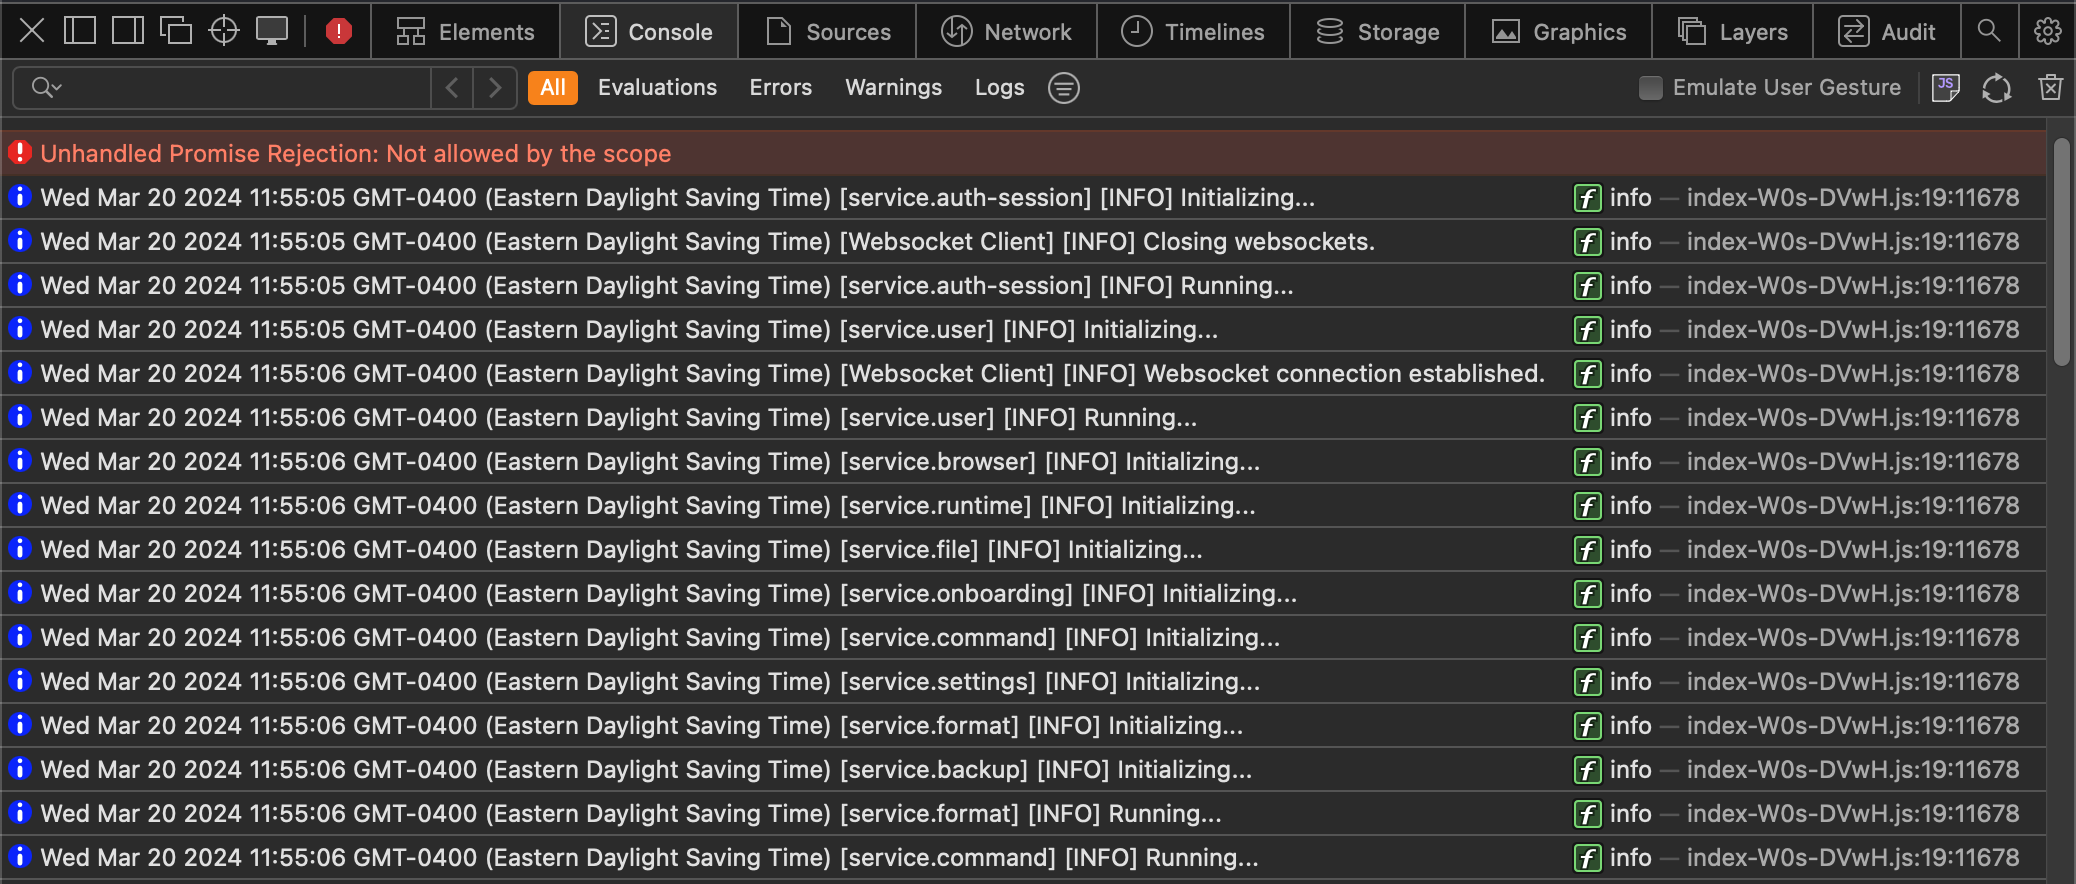
2. Frontend Logs
The second place to loof for logs is in your browser console included in your browser developer tools.
You can open the console by pressing F12 or doing a right-click Inspect Element.
3. Steps to reproduce
For us to be able to help you, we need to be able to reproduce the bug on our side.
Thus, it is critical that you give us as much details as possible on the various steps you took leading to the bug.
A good example of steps would be:
- In
Intercept, click onResponse- Start
Queuing- In a terminal, execute
curl -x 127.0.0.1:8080 https://example.com- Modify response status code
- Forward
- See in terminal that the response was not modified
4. Operating System & Version
Many Caido bugs are depend on the OS and even sometimes the version of that OS. When reporting a bug, please make sure to include as much as information.
A good example would be:
- OS: Mac OS
- OS version: 12 (Monterey)
- Caido client: Caido Desktop
- Caido version: 0.33.0
5. Github Issue
The last step is to open an issue on our Github Tracker.
Thanks a lot for the help! You rock 🤘
WARN: If your steps to reproduce contains sensitive information, please continue reading.
6. (Optional) Discord Channel
We prefer that the production only contain public data, but we understand that it is not always possible. If your data is sensitive, please do contact us on Discord. We will create a private channel for you and you will be able to us that data.
Installation
Caido is available as both a desktop application and a standalone command-line interface (CLI) binary, offering users the flexibility to choose the installation method that best suits their needs.
You can download the installer package from your dashboard or from the releases page of our Github repository. The available installer package can differ based on your operating system, make sure to download the package that is compatible with your system.
Installing Caido on Windows
- Download the Caido installer package for Windows from the dashboard or Github repository.
- Open the downloaded package and follow the prompts to install Caido on your system.
- Once the installation is complete, you can launch Caido from the Start menu or by searching for it in the Windows search bar.
Installing Caido on Linux
- Download the Caido installer package for Linux from the dashboard or Github repository.
- Open a terminal and navigate to the directory where the downloaded package is located.
- Use the command
sudo dpkg -i <package-name>to install Caido. - Once the installation is complete, you can launch Caido by running the
caidocommand in the terminal.
Installing Caido on MacOS
- Download the Caido installer package for macOS from the dashboard or Github repository.
- Open the downloaded package and follow the prompts to install Caido on your system.
- Once the installation is complete, you can launch Caido from the Applications folder or by searching for it in Spotlight.
Running on a VPS
Caido is designed to be a flexible web application security testing tool, and one of its key features is the ability for users to host it anywhere, such as on a virtual private server (VPS).
By default, Caido listens on the IP address 127.0.0.1 and port 8080. This is the recommended configuration as there is currently no built-in access control on the proxy portion of Caido. Listening on 127.0.0.1 limits access to the local machine only.
Here are the steps to host Caido on a Linux-based VPS:
-
Once you have set up a VPS, you can install Caido on it by following the Linux installation guide found here.
-
To access Caido from another machine or another network, you will need to create an SSH tunnel from your local machine to your VPS. This can be done by running the following command on your local machine:
ssh -L <local port>:127.0.0.1:8080 <username>@<your vps IP address>This will forward all traffic on port
of your local machine to port 8080 of your VPS. For example, if you want to use port 1337 on your local machine, you can run the command: ssh -L 1337:127.0.0.1:8080 <username>@<your vps IP address> -
Once the tunnel is set up, you can access Caido by navigating to
http://127.0.0.1:<local port>in your web browser.In the example above, you would navigate to
http://127.0.0.1:1337. You will also have to configure your browser to proxy requests to127.0.0.1:1337.
Running in Docker
Running the image
We offer images on Dockerhub that you can run directly on x86:
docker run --rm -p 7000:8080 caido/caido:latest
This will start Caido on port 7000. You can then point your browser's proxy settings to 127.0.0.1:7000.
To use another port, replace 7000 in the command above with a different port.
For M1 users, it is now possible to enable Rosetta in the Docker settings. You can then run images with
--platform linux/amd64.
Project persistence
By default, projects created in the docker container are not saved between docker run commands.
We recommend mounting a volume to keep your data on your file system and to avoid losing data between Caido updates.
This is done by appending the -v parameter to the docker run command using the format -v <HOST PATH>:/home/caido/.local/share/caido.
Note that the host path must be an absolute path.
Make sure you give the right permissions to <HOST PATH> via chown -R 999:999 <HOSTPATH>.
Your running command should look like the following:
docker run --rm -p 7000:8080 \
  -v /home/my_user/my_data:/home/caido/.local/share/caido caido/caido:latest
... where /home/my_user/my_data will be the folder containing Caido projects.
Building the image
If you prefer to build the image yourself, here is a Dockerfile sample you can use:
## Base ##
FROM debian:bullseye-slim as base

RUN \
  apt-get update && \
  apt-get -y install ca-certificates && \
  apt-get clean

## Download ##
FROM base as download

RUN \
  apt-get -y install curl jq && \
  curl -s https://api.caido.io/releases/latest \
    | jq '.links[] | select(.display == "Linux") | .link' \
    | xargs curl -s --output caido.tar.gz && \
  tar -xf caido.tar.gz && \
  rm caido.tar.gz

## Runtime ##
FROM base

RUN groupadd -r caido && useradd --no-log-init -m -r -g caido caido

COPY --from=download caido /usr/bin/caido

USER caido

EXPOSE 8080

ENTRYPOINT ["caido"]
CMD ["--listen", "0.0.0.0:8080"]
Listening address/port
Caido, by default, listens on the IP address 127.0.0.1 and port 8080. This means that Caido will only be accessible from the same machine it is running on.
However, you can change the listening address and port to suit your needs. There are two ways to change the listening address, depending on whether you are using the CLI or the desktop application.
Please note that if you change the listening address to something other than 127.0.0.1, Caido will be accessible from any machine on the network, so it is important to consider the security implications of doing so.
CLI
When using the CLI, you can update the listening address by using the -l or --listen option followed by the desired address and port in the format ADDR:PORT. For example, to listen on all available network interfaces on port 8000, use the command:
caido -l 0.0.0.0:8000
Desktop App
When using the desktop app, you can change the listening address by using the connection manager. To do this, open the connection manager, and click on the "More options" icon on the right of the instance you want to edit.

Click on "Edit", and update the listening IP and port to whatever you want.

Import the CA certificate in your browser
To use Caido to intercept (and tamper with) your https traffic, it is necessary to import and trust the CA certificate of Caido in your browser.
Log in to Caido
After starting Caido on your machine, navigate to localhost:8080 (or the port you've configured for Caido to listen to) and log in.
Get the Certificate
Open the "User Dropdown Menu" in the top right

Navigate to "CA Certificate" or click here.
Download the Certificate and follow the instructions to import and trust it in your browser of choice.

After you've successfully imported the certificate, you are good to go and can configure your browser to proxy it's traffic through Caido.
Data location
All the data Caido creates is stored in a single folder. Currently, it is not possible to create projects outside this folder. By default, this folder is in a standard location based on the OS.
| OS | Location |
|---|---|
| Linux | ~/.local/share/caido |
| MacOS | ~/Library/Application\ Support/io.caido.Caido/ |
| Windows | %APPDATA%\caido\Caido\data |
You can however change the location of the whole folder if you need to!
WARNING: Make sure to copy your existing data to the new location before restarting your instance. Otherwise it will start fresh as if you were on a new device.
CLI
For the CLI, use the --data-path option:
caido --data-path /some/data/path
Desktop
For the Desktop application, set the Data path in the advanced options:

Overviews
Our awesome community has put together many guides and videos 🎉
If you want your contributions to appear here, please follow the contribution guidelines!
Please note that these videos are not endorsed by Caido.
t3l3machus
TheCyberMentor
CryptoCat
Sean Wright
Interviews
Our awesome community has put together many guides and videos 🎉
If you want your contributions to appear here, please follow the contribution guidelines!
Please note that these videos are not endorsed by Caido.
CTBBPodcast
Tutorials
Our awesome community has put together many guides and videos 🎉
If you want your contributions to appear here, please follow the contribution guidelines!
Please note that these videos are not endorsed by Caido.
Try Hack Me
| OWASP Top 10 Tyler Ramsbey |
|---|
Hack The Box
| Intranet by TheCyberMentor | Intranet by Tyler Ramsbey |
|---|---|
DVWA
| Password Attacks by Alex Kollar | Command Injection by Alex Kollar |
|---|---|
Instances
We use the concept of Instance to refer approximately to an installation of Caido.
To be precise, an instance is the set of files contained in the the data location, thus you can have multiple Caido instances on one machine if you change the data path.
Why?
First, we have to go back on the fact that Caido is built around a client/server architecture. This means you can deploy the Caido CLI anywhere (like on VPS or on Docker). We thus need some form of access control to authenticate the client (Browser or Desktop Application) that connects to that server.
You can find all details in our guide on the topic, but in essence each instance is tied to your account so only you can access it (sharing will be added eventually). Each instance has a set of OAuth credentials given to it by our cloud service that it uses to identify itself when communicating with us.

Desktop
When you use the Desktop Application, you will see by default a Local Instance. This means that you will spawn a Caido CLI process locally on the given port and with the default data path.

Local
You can add instances with the New instance, those can be other Local instances if you want to use another data path or port for example.

Remote
They can also be Remote instances if you just want to connect to an existing Caido CLI running somewhere else.

Dashboard
To manage your instances, you can head over to the Dashboard.
WARN: If you delete an instance and try to log-in again, you will see the error "Login URL generation failed". You will need to reset the credentials.

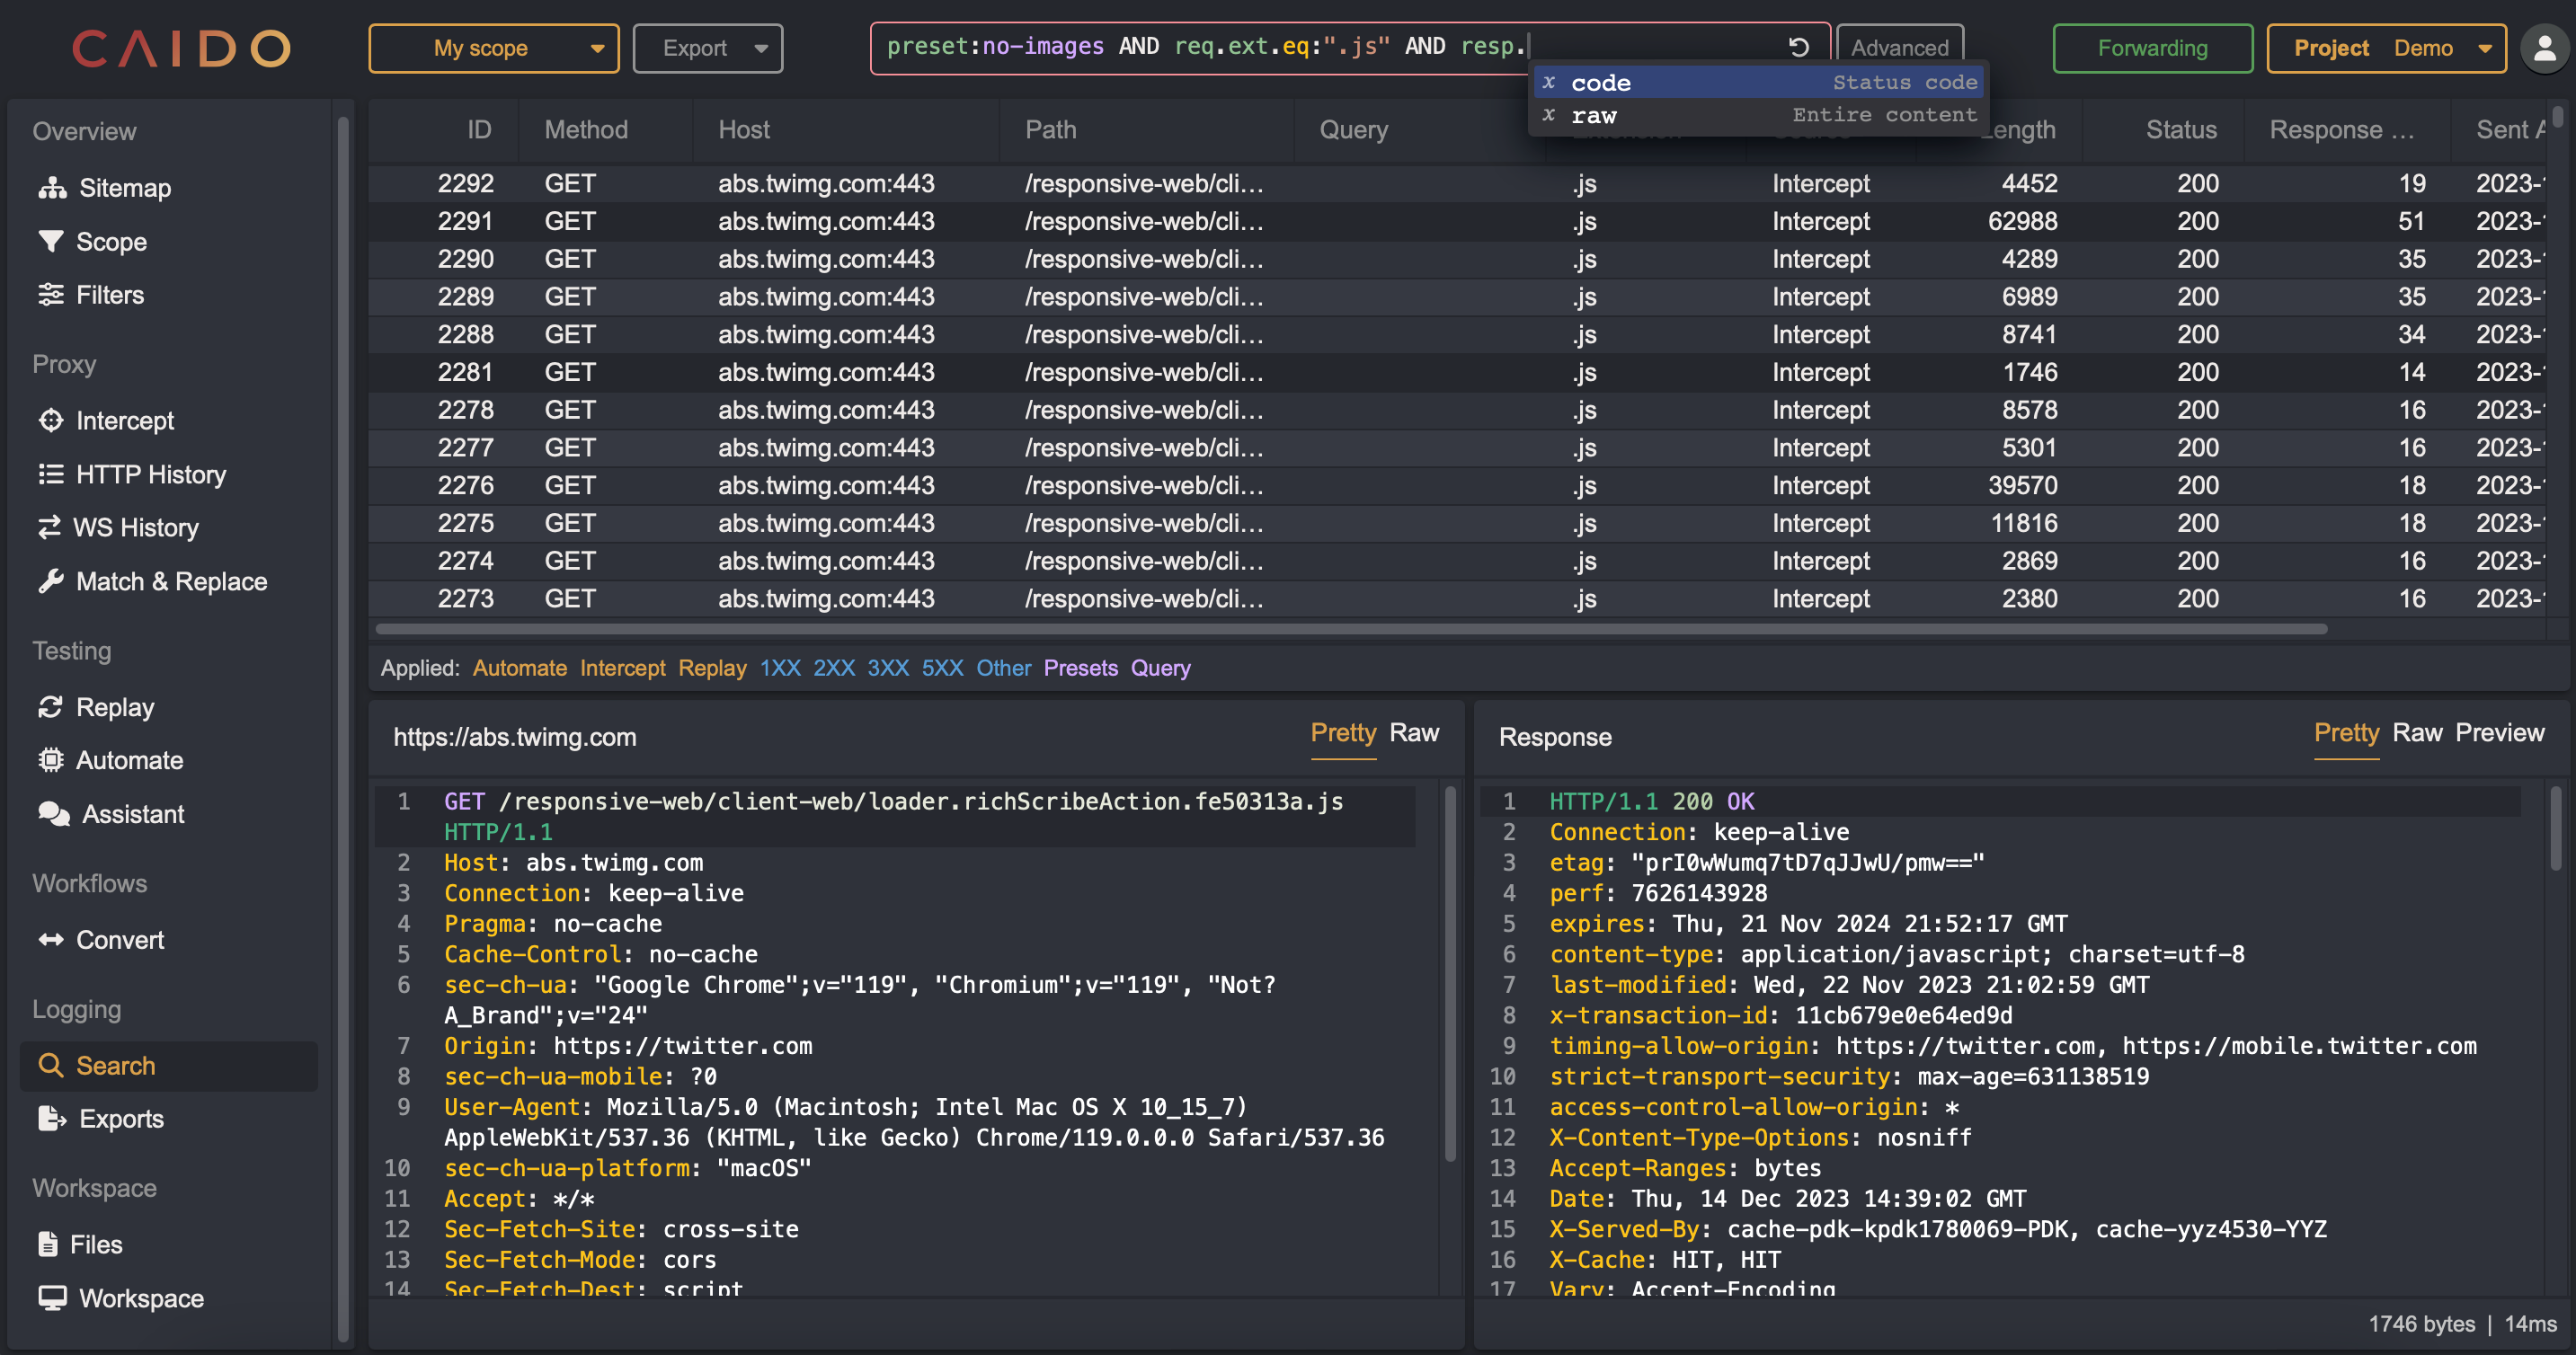
HTTPQL
HTTPQL is the query language we use in Caido to let you filtering requests and responses. It is an evolving language that we hope will eventually become an industry standard.
Primitives

1. Namespace
The first part of a filter clause is the namespace. We currently support 3 namespaces:
- req: For HTTP requests
- resp: For HTTP responses
- preset: For filter presets
The preset namespace is a bit different, it doesn't have a field nor an operator. See the filters page to learn more about filter presets.
2. Field
The second part of filter clause is the field. Fields differ based on the the namespace.
We will add more fields eventually. Let us know which ones you need!
req
- ext: File extension (if we detected one). Extensions in Caido always contain the leading
.(like.js). We are liberal in what we accept as an extension. - host: Hostname of the target server.
- method: HTTP Method used for the request in uppercase. If the request is malformed, this will contain the bytes read until the first space.
- path: Path of the query, including the extension.
- port: Port of the target server.
- raw: The full raw data of the request. This allows you to search on things we currently don't index (like headers).
resp
- code: Status code of the reponse. If the response is malformed, this will contain everything after
HTTP/1.1and the following space. - raw: The full raw data of the response. This allows you to search on things we currently don't index (like headers).
3. Operator
We have two categories of operators depending on the data type.
Integers
That category of operators work on field that are numbers like code and port.
- eq: Equal to
value - gt: Greater than
value - gte: Greater than or equal to
value - lt: Less than
value - lte: Less than or equal to
value - ne: No equal to
value
String/Bytes
That category of operators work on field that are text (or bytes) like path and raw.
- cont: Contains
value(case insensitive) - eq: Equal to
value - like: Sqlite
LIKEoperator. The symbol%matches zero or more characters (like%.jsto match.map.js) and the symbol_matches one character (likev_lueto matchvAlue). - ncont: Doesn't contain
value(case insensitive) - ne: No equal to
value - nlike: SQLITE
NOT LIKEoperator, seelikefor more details.
We don't currently support full regex, but we will in the future.
4. Value
This is the value against which the field will be compared. The value is either an integer or a string depending on the field.
Preset
The preset value is a different. You can reference presets in one of two ways:
- Name:
preset:"Preset name" - Alias:
preset:preset-alias
Head over to the filters page to learn more about filter presets.
Standalone
We support string standalone values without namespace, field and operator (like "my value").
It is a shortcut to search across both requests and responses, it is replaced at runtime by:
(req.raw.cont:"my value" OR resp.raw.cont:"my value")
Query

Queries are composed of multiple filter clauses that are combined together using logical operators and logical grouping.
Logical operators
We offer two logical operators:
- AND: Both the left and right clauses must be true
- OR: Either the left or right clause must be true
Operators can be written in upper or lower case. Both have the same priority.
Logical grouping
We don't have priority of operations, this means that the automatic grouping is done from left to right (this might change eventually):
clause1 AND clause2 OR clause3is equivalent to((clause1 AND clause2) OR clause3)clause1 OR clause2 AND clause3is equivalent to((clause1 OR clause2) AND clause3)clause1 AND clause2 AND clause3is equivalent to((clause1 AND clause2) AND clause3)
We thus recommend that you insert parentheses to make sure the logicial groups represent what you are trying to accomplish.
Workflows
Workflows are the main way to customize Caido to suit your needs. A workflow consists of three components:

Nodes
Nodes are draggable blocks that perform specific actions. Add nodes to your workflow by dragging blocks from the left panel.

Clicking a node reveals its properties.
A node takes a set of inputs and optionally produces a set of outputs.
Each node has a customizable alias which is used to uniquely identify itself inside a workflow.

Caido comes with a default list of nodes. Here are a few we support:
- Encoding nodes (Base64/URL/Hex)
- Hashing nodes (SHA1/SHA2)
- Code nodes (Shell/JavaScript)
- Control nodes (If-Else/If-Else-Javascript)
- Misc nodes (Set-Color/HTTPQL)
Connections
Connections determine what order you want the nodes to run in.
Drag the bottom socket of one node into the top socket of another to connect them together.

Inputs & Outputs
While connections define what order the nodes are run in, they do not define what inputs each node will use.
Node inputs fall under two types:
- Constant values
- Reference values
You can toggle between each type with the Use references checkbox.

When using a constant value, executing the node will use the value as-is. When using a reference value, executing the node will use the output of a previous node.
To use reference values, the content of the text field should be under the format:
$[node_alias].[property_alias]
Here's an example where the data output of the start node is used as data input for the url_decode node:
| Output Node | Input Node |
|---|---|

|

|
Tabs
Pages such as Replay and Automate feature a tab system to quickly switch between items of interest. These tabs are usually accompanied with a tree view on the left side of the page.
In case you need to declutter your workspace, you can close any tab at any time without worrying about losing your data. Just head over to the tree view in the sidebar, and you'll find all your sessions ready to be reopened.
This functionality allows you to manage your screen real estate efficiently while maintaining the ability to access and resume your work at any point.

Layout Customization
Caido offers a high degree of customization, allowing users to resize the different panes of the application to suit their needs.
To customize the layout of a page, simply drag the side of the panes to resize them according to your preferences.

Sitemap
The Sitemap feature allows you to visualize the structure of any website that is proxied through Caido.
It keeps track of domains, folders, and requests, as well as any variations in query parameters and post bodies. The Sitemap page provides a clear, hierarchical view of the website's structure, making it easy to identify and explore different parts of the site.

Navigating the Sitemap
The Sitemap page displays a tree-like structure, with the root node representing the root domain of the website. Each branch of the tree represents a subdomain or subfolder, and the leaves of the tree represent individual requests. You can click on any node to expand or collapse it, revealing or hiding its child nodes.
Listing requests
You can also list all the requests that belong to a specific branch of the Sitemap tree by clicking on a tree node. The request table will be updated to display all the associated requests with details like the request method, path, status code and response length.
Scope
Scopes allows you to filter requests throughout the app by creating presets of in-scope and out-of-scope hosts. Scoping is available for most of the Caido tools.
Creating a scope
You can create as many scopes as you want. Scopes are specific to a project. Scopes are composed of scope rules:
- They can only contain lowercase letters (
a-z), numbers (0-9) and some symbols (-,_,*,?). - They can include Glob wildcards (
*and?) to support multiple subdomains (*.example.com) and TLD (*example*). - They currently only support domains, not paths.
- They can be
In Scopeacting as an allow list orOut of Scopeacting as a deny list.
NOTE: Adding or removing a rule can be slow if you have a big project since Caido will re-index your data on each change

Using a scope
Once you have created a scope preset, you can apply it to a given tool by selecting it from the Scope Preset dropdown located in the top left corner of each page that support it.
In Caido, scopes are NOT global. Each tool and (eventually) each view can have a different scope. You can switch between scopes very fast.

Filters
The filters page allows you to create filter presets that can then later be used in HTTPQL queries. We provide a few presets for each new project, but you can modify or update them if you wish to.
The filters are project specific for the moment.

Name & Alias
The name and alias are used to reference the filter preset in queries using either preset:"Preset name" or preset:preset-alias.
This means they must be unique across all presets.
The alias can only contain lowercase letters (a-z), numbers (0-9) and some symbols (- and _).
Expression
The expression is an HTTPQL query, but it has some limitations:
- It cannot reference other
presets - The shortcut
"my value"is always expanded as(req.raw.cont:"my value" OR resp.raw.cont:"my value")
Intercept
The Intercept page allows you to control the flow of requests through the proxy by pausing and resuming forwarding. When forwarding is paused, requests and responses that go through the proxy are temporarily stored in the Intercept table, where you can review, edit, or drop them before forwarding them.
To eventually add websocket interceptions to Caido, vote for this issue here.
Pausing and Resuming Intercept
To pause forwarding, toggle the "Forwarding" button on the top right of any page. This will prevent any new requests from being forwarded through the proxy and will queue them up in the Intercept table.
The interface allows you to queue multiple requests and responses in the Intercept table. All requests are visible in one place and can be sorted.
For each request in the Intercept table, you can then choose to edit its contents, as well as forward or drop it.
When you're done forwarding, toggle the "Queuing" button to resume forwarding. This will forward all the queued up requests in the Intercept table.

Scope
The Scope setting allows you to define and use scopes to narrow interception of requests and responses.
By selecting a scope, requests and responses for hosts in-scope will be intercepted and those for hosts out-of-scope will pass through.

Modifications of requests and responses
If you choose to edit content in the Intercept table, modifications will be visible after your rule in Match & Replace is done and active.
In Search and HTTP History, a new entry will then be available in the dropdown menu called Manual for your edits.

HTTP History
The HTTP History feature allows you to view requests and responses as they pass through the proxy. The HTTP History page shows a table of all requests that have been proxied through Caido, along with details such as the request method, host, path, status code and length.

Filtering
The HTTP History page provides several ways to filter and scope the requests displayed. These filters and scoping options can be useful to focus on specific requests or to exclude certain requests from the list.
You can filter requests by:
- File Extension
- Method
- Port
- Path
- Status Code
- ...

You can also scope the requests by host. See the Scope page for more details.
WS History
Streams
The WS History feature allows you to view data exchange between the client and the server passing through the proxy.
When an HTTP Connection is upgraded to Websocket, it will appear in the stream table.
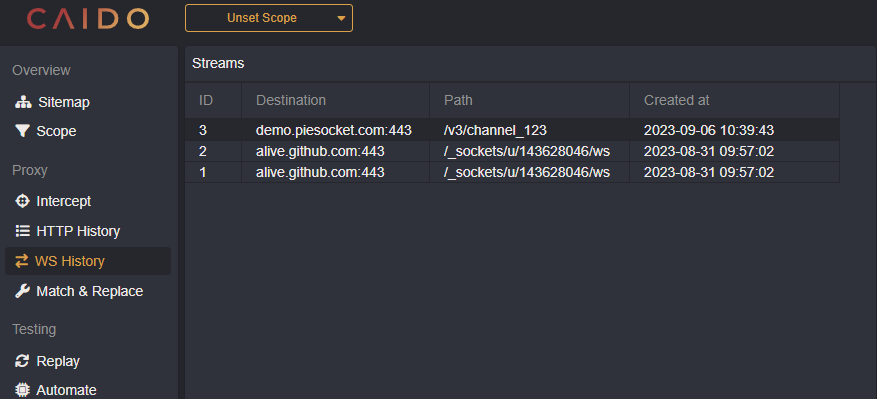
Clicking on a stream will display the messages and their direction.
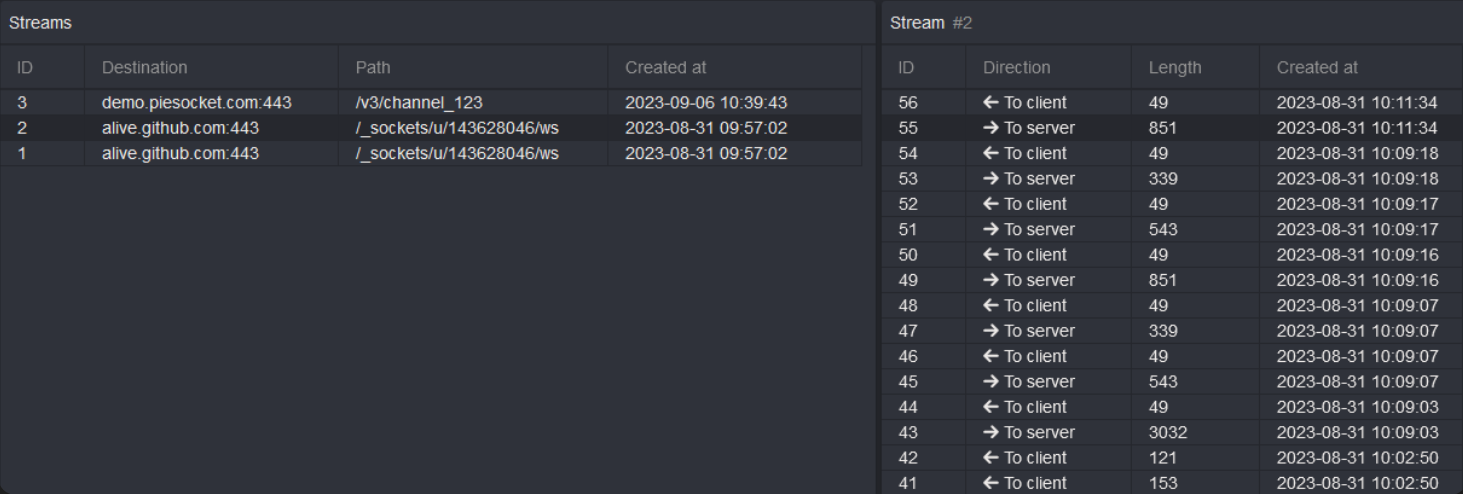
You can open each message to display the content.

Scopes
Scopes can be used to limit the domains displayed in the stream's table.

Match & Replace
The Match & Replace feature allows you to define match & replace rules. These rules can be used to modify requests as they pass through the proxy.
Match & Replace rules can be organized into collections, which allows you to group rules however you see fit. For example, you can create a collection to group User-Agent rules, header rules, etc.

To create a Match & Replace rule, click on the + icon of the collection where you want to create the rule or New Rule to create it in the Default collection.
When creating a new rule, you can update the following fields:
Name: A name for the rule.Strategy: Defines what part of the request to perform the match/replace on, such as request header, response header, request body, request first line, etc.Search as regex: If theSearch termis a regex or a simple string matchSearch term: The term to search for in the defined part of the request or response.Replace term: The term to replace the search term with.Condition: a HTTPQL query that defines which requests/responses this rule applies to.
If you're having an issue with your Match & Replace rule not taking affect, and you've already double checked your
Strategy, make sure you're looking at the un-prettified version of the request/response body by pressing thebutton in HTTP History to ensure your spacing is correct.
Testing your rule
When you're done updating your rule, you can use the bottom panes to test your rule against a mock request/response.
Click on the Test button and see if your rule works as intended.
Active rules
You can enable or disable individual rules by clicking on the checkbox next to each rule in the tree view.
Enabled rules will be shown in the Active rules section of the page. This section displays the list of the rules that are currently active and will be applied to the requests that pass through the proxy.
IMPORTANT
The order of the rules in the "Active rules" section determines the order in which they will be applied to the requests and responses.
You can change the order of the rules by dragging and dropping. This allows you to adjust the order to suit your needs, and can be useful when working with multiple rules that may have conflicting or overlapping conditions.
Examples
Append a request header with a custom string
Many popular bug bounty programs require a custom header to be sent with your requests. You can do this in Caido using the Match and Replace feature. An example of this for Bugcrowd is to send the word bugcrowd as your User-Agent header.
Strategy
Request header (Enable
Search as Regex)
Search
^(User-Agent: .+)
Replace
$1 bugcrowd
Turning an isAdmin boolean from False to True
It is common to see a boolean such as isAdmin in the JSON API response of a request which describes the current user (i.e. /api/user/properties). By using a Match & Replace rule to turn this to true, we can navigate the client-side of the application as if we were an admin.
Strategy
Response Body
Search
"isAdmin":false
Replace
"isAdmin":true
Replay
The Replay page allows you to edit and replay requests individually. This feature provides a flexible way to test your web applications by replaying requests with different parameters/headers.
You can create requests from scratch, or start from any existing request inside the application. Once a request is created, you can edit it and replay it as many times as needed.

Collections
Requests are organized into collections and sessions.
A session is a group of requests that are related to each other. Every time you edit and send a request, it is saved in the history of that replay session. This allows you to keep track of the changes you made to the request, and easily go back to previous versions.
Replay collections allow you to group sessions together. This allows you to keep your sessions organized and easily switch between them. You can group sessions however you want, for example, by project, by feature or by environment.
Automate
The Automate page allows you to send requests in bulk. This feature provides a flexible way to bruteforce certain parameters of requests using wordlists.
You can create a session from scratch, or start from any existing request inside the application.

Payloads
To replace an element in your query, you first have to highlight it and click on Mark. This will unlock the payload section on the right. Depending on the attack strategy and the number of markers, you will have one or more payloads to configure.
Strategies
We currently provide 4 attack strategies:
- Sequential (Sniper): This will replace markers one at a time. If you have multiple markers, only one will be replaced for any given request.
- All (Battering ram): This will replace all the markers with the same value.
- Parallel (Pitchfork): This will replace all the markers with different values from the different payloads. This requires payloads that each have the same number of elements.
- Matrix (Cluster bomb): This will replace all the markers with all the combinations of payloads. Payloads can have different number of elements, but beware that this can create a large number of requests.

Types
For each payload, you can choose a type from the list:
- Hosted File: This allows you to select one of the files you had previously uploaded to the caido instance using the Files page.
- Simple List: This is for cases where you want to test a short list of elements.
- Null Payload: This is useful to generate requests without changing anything in it.

Settings
The settings allow you to choose how the Automate session will run. This allows you to throttle the bruteforce to avoid limits and retry in case of error. We do not limit the number of workers, but we suggest to not put too high a number unless latency is an issue.

Assistant
PRO FEATURE
The Assistant helps you understand requests, explains elements like headers and suggests attack vectors. The AI assistant in Caido is taylored for security research. See our privacy policy for more info.
Make sure to anonymize sensitive information when you use this tool.
Data is sent to a third party (OpenAI) and can be stored for up to 30 days. See their privacy policy for more info.
What are models?
Large Language Models (LLM) like GPT-3.5 are created through deep learning techniques and have the capability to understand, generate and manipulate text in a wide range of natural language tasks.
However, there are certains limitations to LLMs such as hallucinations (LLMs generating info that is not accurate or even completely fabricated), lack of understanding and biases.
LLMs are not going to "hack for you" since they have no consciousness or intent. They generate responses based solely on patterns in the data and input they receive.
Credits system
To prevent abuse, we use a credit system. Each pro user gets 500 000 credits per month. Credit usage depends on the model used. We currently offer ChatGPT-3.5 Turbo, but we will add support for the other models eventually.
- 1 credit is equal to 1 token
- A token is roughly a word or ¾ of a word.

- If you send follow-up messages in the same session, the tokens of all previous messages count in your credit usage
- You can send a maximum of 4000 tokens in a single session
For more info on what tokens are, check the ChatGPT Tokenizer.
Explain requests
Prompt
Explain the operation being performed by the endpoint in this request:
===
<YOUR REQUEST HERE>
===
The Assistant can help you understand what a request is doing by explaining it in natural language.
Be careful if your payload is huge, it can cost a lot of credits.

You can access the Assistant feature easily by right-clicking on a request in HTTP History or Search.

Warning: the request is sent automatically along with any sensitive information contained in it
If you need to anonymize data, copy the prompt the Assistant should use, paste it in a new attempt with your request and remove any sensitive information before submitting it.
Generate CSRF
Prompt
Generate a CSRF PoC in HTML for the following request:
===
<YOUR REQUEST HERE>
===
The Assistant page currently allows you to generate proof of concept CSRF. We are planning to add more attacks in the future.
You can generate CSRF payloads for a specified request with the right click menu, similar to the Explain request.

Convert Workflows
Before you dive in, read up on the workflow concept first.
Convert Workflows allow you to create actions using strings as input.
These workflows are triggered manually and are integrated in various areas of Caido:

Special Nodes
Most convert nodes have simple inputs that are covered by the workflow guide.
There are a few exceptions that require further explanation:
JavaScript
Javascript code nodes allow you to run custom scripts in your convert workflow.
They have a minimal code editor available in the properties.
The code must export a function called run that takes an input and the sdk as arguments and return either a String or an Array of numbers (representing the UTF-8 bytes).
By default, the input is an array of bytes.
export function run(input, sdk) {
  let parsed = sdk.asString(input);
  sdk.console.log(parsed);
  return parsed;
}
The sdk object provides some basic utilities, namely:
console: This is similar to theconsoleprovided in standard Javascript runtimes. Only thelogmethod is available at the moment.asString: This loosely converts an array of bytes into a String, invalid characters will be represented with the � character.
Please let us know which utilities you would like to see in the SDK!
Shell
Shell nodes allow you to call external programs in the workflow. Depending on the platform on which Caido is running (unix or windows) you will have access to different shells.

Since those shell are run in non-interactive mode, they do not source any files prior to running the script (see bash manual). For some shells, Caido will try to source the default .[shell]rc file in your home directory. If that doesn't work for you, you can override manually the Init.

The command receives the data via STDIN and is expected to output on STDOUT. The STDERR will be printed in the Caido logs. The command should also exit with 0.

Control flow
Control flow nodes allow you to take various paths based on some conditions.
Right now we only offer an if/else, but we will likely offer loops and other control flow nodes in the future.
The If/Else Javascript node is very similar to the code node, with the exception that it must return a boolean.
export function run(input, sdk) {
  return false;
}
Based on the result, the execution will take the True or False branch.
Make sure to connect both to the rest of the workflow!
Search
The Search feature provides a comprehensive view of all the requests that have been generated by tools, such as the automate and replay features, in addition to requests that are proxied through Caido. The Search page is similar to the HTTP History page, with the same layout and scoping options but different filtering.

Filtering
PRO FEATURE
The filtering is using our new query language HttpQL.
To avoid having to always some very common filters, we also offer an Advanced panel that allows you to select:
- The
sourceof the requests (implicitOR) - The
status codeof the responses (implicitOR) - The
presetsto use (implicitAND)
There is an implicit AND in between each of those sections.

Exports
The Exports feature allows you to export data from the HTTP History and Search pages and use data collected by Caido in other tools. This feature can also be used for archival purposes or audit purposes sometimes required by clients.
Exports types
The Exports feature generates two types of exports:
- All: exports all data of the specified tool.
- Current rows (Pro feature): exports only rows that match the filter and scope currently set.

Exports formats
Two export formats are available: JSON and CSV.

JSON
For the JSON format, data will be exported as an array of requests with their respective response nested. See the full JSON schema below.
SCHEMA
{
"$schema": "http://json-schema.org/draft-07/schema#",
"title": "DataExport",
"type": "array",
"items": {
  "$ref": "#/definitions/ExportRequest"
},
"definitions": {
  "ExportRequest": {
    "type": "object",
    "required": [
      "alteration",
      "created_at",
      "edited",
      "host",
      "id",
      "is_tls",
      "length",
      "method",
      "path",
      "port",
      "query",
      "source"
    ],
    "properties": {
      "alteration": {
        "type": "string"
      },
      "created_at": {
        "type": "integer",
        "format": "int64"
      },
      "edited": {
        "type": "boolean"
      },
      "file_extension": {
        "type": [
          "string",
          "null"
        ]
      },
      "host": {
        "type": "string"
      },
      "id": {
        "type": "integer",
        "format": "int32"
      },
      "is_tls": {
        "type": "boolean"
      },
      "length": {
        "type": "integer",
        "format": "int32"
      },
      "method": {
        "type": "string"
      },
      "parent_id": {
        "type": [
          "integer",
          "null"
        ],
        "format": "int32"
      },
      "path": {
        "type": "string"
      },
      "port": {
        "type": "integer",
        "format": "int32"
      },
      "query": {
        "type": "string"
      },
      "raw": {
        "type": [
          "string",
          "null"
        ]
      },
      "response": {
        "anyOf": [
          {
            "$ref": "#/definitions/ExportResponse"
          },
          {
            "type": "null"
          }
        ]
      },
      "source": {
        "type": "string"
      }
    }
  },
  "ExportResponse": {
    "type": "object",
    "required": [
      "alteration",
      "created_at",
      "edited",
      "id",
      "length",
      "status_code"
    ],
    "properties": {
      "alteration": {
        "type": "string"
      },
      "created_at": {
        "type": "integer",
        "format": "int64"
      },
      "edited": {
        "type": "boolean"
      },
      "id": {
        "type": "integer",
        "format": "int32"
      },
      "length": {
        "type": "integer",
        "format": "int32"
      },
      "parent_id": {
        "type": [
          "integer",
          "null"
        ],
        "format": "int32"
      },
      "raw": {
        "type": [
          "string",
          "null"
        ]
      },
      "status_code": {
        "type": "integer",
        "format": "int32"
      }
    }
  }
}
}
CSV
For the CSV format, each request/response pair will be exported on a row. Since CSV does not support nested columns, the response's columns have been renamed.
COLUMNS
id,host,method,path,length,port,raw,is_tls,query,file_extension,source,alteration,edited,parent_id,created_at,response_id,response_status_code,response_raw,response_length,response_alteration,response_edited,response_parent_id,response_created_at
Download
Once the export is completed, it will be available on the Exports page.

From there you can download it, rename it, or delete it.

Files
The Files page allows users to upload files to the Caido instance for future use in other features. This feature is particularly useful when you need to use the same file in different parts of the application.
Currently, files uploaded in this page are only available for use in the Automate page.

Projects
The Projects tab allows you to organize your work by creating different projects for different tasks or assessments. A project in Caido acts as a container for all the information related to a particular assessment, such as requests, filters, scope presets and tamper rules.
We encourage you to keep your work organized by creating many smaller projects.

By clicking on the three dots to the right of the project Select button, you may:
- Rename your project
- Copy the file path to your project
- Create a backup of your project
- Delete your project

To restore your projects from a backup, press the Restore button on the Backups tab or use the Import button near the search bar on projects tab and provide a path to a .caidobak file.

Project Quick Change
The Project button on the top right of any page enables you to easily switch between your projects. No restart is needed to do so. You can navigate different assessments quickly without losing track of the information you've collected.

Project Updating
When structural changes occur after a Caido update, sometimes it is necessary for Caido to update a project to a new project format. This can take time but will ensure you're working with the latest capabilities in Caido.
Projects are automatically upgraded when you use them with a newer Caido version and CANNOT be downgraded

Backups
You can create backups of your projects at anytime inside Caido.
They are self-contained files that can be easily shared with colleagues, partners, clients, etc.
Creating backups is a Pro feature, but all plans can restore backups.
Create
PRO FEATURE
You create backups directly from the Projects tab of your Workspace in the 3-dots menu.
It is possible to backup any project including the currently selected one.

Once the backup is done, it will be available in the Backups tab. If your instance is remote, you can Download the backup to your local machine. Otherwise, you can click on the 3-dots menu to get the path on disk if you wish to copy it directly.

Restore
Restoring a backup is usually done via the Import button in the Projects tab.
You will need to upload a backup file to the instance to perform the restore.
Restoring always creates a new project, that is why you also need to enter a unique name.

Projects can also be restored from existing backups in the Backups tab. It will also create a new project on restore.

Custom CSS
The Custom CSS feature allows users to personalize the look and feel of the interface.
By writing your own CSS code in the provided text area, you can modify the aesthetic aspects of the application, such as colors, layouts, and fonts, to suit your preferences or needs.

Themes
One of the simplest changes you can make is to customize the default theme. You can do this by adjusting the CSS variables we've provided to your liking.
Some sections of Caido are not be configurable with CSS variables yet. Depending on your use case, you might have to add CSS to existing classes directly.
Here is an (incomplete) example of a CSS snippet for the solarized dark theme. You can paste this into the Custom CSS field to try it out.
:root {
  /* === Background === */
  /* Background: Foundations */
  --c-bg-default: #002b36;
  --c-bg-subtle: #073642;
  --c-bg-inset: #586e75;

  /* Background: Roles */
  --c-bg-primary: #dc322f;
  --c-bg-primary--pressed: var(--c-red-700);
  --c-bg-secondary: #b58900;
  --c-bg-secondary--pressed: var(--c-yellow-400);
  --c-bg-tertiary: var(--c-gray-400);
  --c-bg-tertiary--pressed: var(--c-gray-500);
  --c-bg-danger: var(--c-red-300);
  --c-bg-danger--pressed: var(--c-red-400);
  --c-bg-info: var(--c-blue-100);
  --c-bg-success: var(--c-green-400);
  --c-bg-success--pressed: var(--c-green-500);

  /* === Foreground === */
  /* Foreground: Foundations */
  --c-fg-default: var(--c-white-100);
  --c-fg-subtle: var(--c-gray-400);
  --c-fg-onEmphasis: var(--c-gray-900);

  /* Foreground: Roles */
  --c-fg-primary: var(--c-red-600);
  --c-fg-primary--pressed: var(--c-red-700);
  --c-fg-secondary: #b58900;
  --c-fg-secondary--pressed: var(--c-yellow-400);
  --c-fg-tertiary: var(--c-gray-400);
  --c-fg-tertiary--pressed: var(--c-gray-500);
  --c-fg-danger: var(--c-red-300);
  --c-fg-danger--pressed: var(--c-red-400);
  --c-fg-info: var(--c-blue-100);
  --c-fg-success: var(--c-green-400);
  --c-fg-success--pressed: var(--c-green-500);

  /* === Border === */
  /* Border: Foundations */
  --c-border-default: var(--c-gray-600);

  /* Border: Roles */
  --c-border-primary: var(--c-red-600);
  --c-border-secondary: #b58900;
  --c-border-tertiary: var(--c-gray-400);
  --c-border-danger: var(--c-red-300);
  --c-border-info: var(--c-blue-100);
  --c-border-success: var(--c-green-400);
}
(WIP) Custom JS
(WIP) Custom Workflow Nodes
Files
Caido Storage Folder
All the data Caido creates is stored in a single folder. It can be moved to another computer, but you might encounter issues (we are working on project export/import).
| OS | Location |
|---|---|
| Linux | ~/.local/share/caido |
| MacOS | ~/Library/Application\ Support/io.caido.Caido/ |
| Windows | %APPDATA%\caido\Caido\data |
Folder Structure
We do not recommend modifying the files directly as this might result in problems in the application and/or corruption of data. Proceed at your own risk.
Inside the storage folder you will see the following files:
config.db: Contains all the non-critical configurations of the instance. Also contains the cached data from the cloud for offline support.secrets.db: Contains all the sensitive configurations. Currently, it is AES encrypted with a static secret, but we plan to support a user-specified password in the future.projects.db: Contains the metadata of the projects and hosted files.
Each one of those files is a sqlite3 database in journal mode. We usually use pretty recent sqlite3 versions, but we do not make any guarantees on exactly which.
You can also see the following folders:
files: Those are the hosted files that you uploaded to your instance.browsers: The binary of the browser used for rendering.projects: The data for each project. Each sub-folder will be the UUID of the project (structure detailed below).
For each project, you will see the following:
database.caido: The majority of the data of the project is contained in that database.database_raw.caido: Contains the raw data of the requests and responses, it is split for performance reasons.exports: Folder containing the exported data
Each one of those files is a sqlite3 database in wal mode. Thus if you copy them, make sure to also copy the -wal files.
Cloud
Caido Cloud is comprised of the dashboard and the API that the instances use to communicate with us.
Why?
We are aware that tying our product to a cloud is controversial. We developed our own cloud platform for a couple of reason:
- Billing: We don't bill per license, we bill per user and we want to allow you to install Caido on as many machines as you want. It is not possible to do so without a concept of account (notably to prevent abuse).
- Access Control: We want to allow multiple users to share instances securely without having to re-create a new account on each one, this requires a central service to set permissions. You can learn more about the process in the Authentication page.
- Complementary Services: We want to offer complementary cloud services like the Assistant and sharing capabilities (in the future).
API
In an effort of transparency, we are publishing the OpenAPI specification of the cloud API used by Caido instances. It is automatically updated when we deploy changes to our production environment.
Data collection
When you register for Caido, we collect your name and email address, as well as information about your user agent. You can always request for us to delete your account by sending us an email at info [at] caido.io.
When you use Caido, we collect interaction data between your instances and our cloud services. This includes the IP address of the instance and API call actions/timestamps. If you look at the OpenAPI specification, this mainly relates to:
/instance/alive: We track instance startup and alive status once per 24H/instance/user/session: We track when a user interact for the first time with an instance and once every hour/instance/user/profile: We track when a user interact for the first time with an instance and once every hour/instance/assistant/complete: We track assistant token usage, but not the messages sent to us.
We do not collect any data stored on your instances nor interactions within the caido application.
Location & Security
- Our Cloud services are currently hosted on Render in their Oregon (USA) region. Refer to their trust page for more information.
- The assistant uses the OpenAI services hosted in the US. Data sent to it can be stored for up to 30 days.
- The public facing part of our API is protected by Cloudflare.
- We perform daily backups that are stored encrypted for 30 days on Google Cloud in the US.
- Our data in transit uses HTTPS with TLS 1.2 and data at rest uses AES-256.
- Our production environment can only be accessed by the founding team using Tailscale.
If you wish to report a security issue, please contact us at security [at] caido.io
Authentication
The authentication in Caido is based on the OAuth 2.0 Authorization Framework. It replaces the need for licenses and will allow us to provide hosted and sharing services down the line. Each instance registers itself with our cloud API using the Dynamic Client Registration Protocol and obtains a client ID and secret. Upon the first login, the user will "claim" the client ID for its instance.
WARNING: Even if the API is authenticated, the actual proxy is currently not protected. That is why we strongly advise not to put your caido instances on the open internet.
Grants
We use a few OAuth2 grants depending on the API.
- Client Credentials: We use this grant to get an access token that authenticates the instance itself with the cloud.
- Device Authorization: We use this grant to get an access and refresh tokens that authenticate a user. This grant is nice because it doesn't require a redirect from the browser contrary to most other grants.
- Refresh Token: We use this grant to refresh the access token of the user without having to ask the user to re-login. At this moment, we do not make any guarantees on the lifetime of the tokens.

Secrets storage
- Client secret: Stored encrypted in the
secrets.dbdatabase on the instance disk. - Instance access token: Stored encrypted in the
secrets.dbdatabase on the instance disk. - User access & refresh tokens: Stored in the browser
local storageof the user. Never stored on the instance, but can be present in memory.
Documentation
Our documentation is totally open source and is there to help the community. We are doing our best to improve it, but we would gladly welcome your contributions. Don't hesitate to join our Discord if you need help.
Requirements
Steps
Prepare
- (Optional) Open an issue on the repository to let us know you are working on something
- Fork the repository
- Clone your fork:
git clone https://github.com/[USERNAME]/documentation - Move into the directory:
cd documentation - Create a new branch:
git branch -b [BRANCH NAME]
You are now ready to edit files 🚀
Edits
- Pages are primarely markdown files, but HTML can be used too
- Always link pages in the
SUMMARY.mdfile otherwise they won't show up - To render the website we suggest using:
mdbook serve
Publish
- Commit changes:
git add . && git commit -m "[WHAT IS MY COMMIT ABOUT]" - Push changes to your fork:
git push - Open a pull request on the Caido repository
- A preview link will appear in a comment
- Sign the CLA using the link that will also appear in a comment
We will then check your pull request, make changes if necessary and merge it. It will then appear on the official documentation 🎉