Remote Hosting
In this tutorial, you will learn how Caido's client/server-based architecture enables remote hosting, what advantages that setup provides, and how to configure it for different environments.
Architecture
Caido consists of two components:
- The client component.
- The server component.
When you're using the Caido desktop application, both components are packaged together:
- The client component is an Electron application installed on your local device that includes the windows, interfaces, menus, buttons, and other GUI elements you use to operate Caido.
- The server component is the Caido CLI tool that runs as a background process that listens for operations generated by the client component and handles proxied network traffic.
However, the server component, the Caido CLI, can be installed as a standalone binary.
Once the binary is launched, instead of operating Caido via an installed desktop application, the Caido GUI becomes available as a browser web application.
The decoupling of the two components is what allows you to install the server component on a remote server and access the instance from your local device.
Being able to run the Caido CLI on a remote server and control it over the web offers several advantages:
- Instead of keeping your own device awake, Caido can be offloaded to a server that is running continuously.
- You can use a server with better hardware specifications than your own device, improving performance.
- You and other members of your Team can access the same instance from multiple devices.
- Instances can be deployed automatically on-demand with registration keys.
- You can create instances using your own infrastructure, allowing you to store security audit data on your own servers.
NOTE
True multi-user instance usage is not yet available. However, data can be shared between members via the Drop plugin.
There are multiple ways to launch the Caido CLI on a remote server and access the GUI, which we will cover below.
Downloading & Launching the Caido CLI
The Caido CLI is available as either a standalone binary or a Docker image container.
Standalone Binary
TIP
To sort JSON data, install the jq tool:
sudo apt install jqTo list the latest release of the Caido CLI for your device's operating system, enter:
curl -s https://caido.download/releases/latest | jq -r '.links[] | select(.os=="linux" and .kind=="cli") | .link'curl -s https://caido.download/releases/latest | jq -r '.links[] | select(.os=="macos" and .kind=="cli") | .link'(curl.exe -s "https://caido.download/releases/latest" | ConvertFrom-Json).links |
Where-Object { $_.os -eq "windows" -and $_.kind -eq "cli" } |
Select-Object -ExpandProperty linkTo download the Caido CLI, replace <url> in the following command with the appropriate link for your operating system architecture:
curl -L -o caido-cli.tar.gz <url>curl -L -o caido-cli.zip <url>curl.exe -L -o caido-cli.zip <url>To extract the Caido CLI binary from the downloaded archive, enter:
tar -xzf caido-cli.tar.gzunzip -o caido-cli.zipExpand-Archive -Path caido-cli.zip -DestinationPath .DANGER
Running Caido with root/administrative privileges is NOT recommended. Doing so will create issues later on since any resource created by Caido will be owned by the root/administrator user. DO NOT DO THIS.
Once the binary is extracted, to launch the Caido CLI, enter:
./caido-clicaido-cli.exeDocker Image Container
The Caido CLI can also be launched with Docker Compose. Ensure Docker Engine is installed and the Docker daemon is running or launched.
By default, Caido projects are not saved between container restarts unless project data is stored on the remote host. So, to persist project data, create a directory on the remote host (e.g. ~/caido-docker):
mkdir -p ~/caido-dockerOnce the directory is created, create a docker-compose.yml file on the remote host with the following content. Replace /home/user/caido-docker with the absolute path to the directory created above, and replace 7000 with an unused port on the remote host if needed:
services:
  caido:
    image: caido/caido:latest
    container_name: caido
    ports:
      - "127.0.0.1:7000:8080"
    volumes:
      - /home/user/caido-docker:/home/caido/.local/share/caido
    restart: unless-stopped
From the directory containing the docker-compose.yml file, download the image:
sudo docker compose pullNext, obtain the uid and gid of the caido user in the Docker container:
sudo docker compose run --rm caido idTo grant ownership of the directory (e.g. ~/caido-docker), replace <uid> and <gid> in the following command with the uid and gid of the caido user:
sudo chown -v -R <uid>:<gid> ~/caido-dockerTo launch the container in the background:
sudo docker compose up -dAccessing the Instance via SSH
Once the Caido CLI is launched, you can access the Caido GUI over a secure SSH tunnel.
To connect to an instance, open a new terminal and replace <local-port> with an unused port on your local device and replace <username> and <remote-host> with the username and IP address of the remote host:
# Standalone Binary
ssh -L <local-port>:127.0.0.1:8080 <username>@<remote-host>

# Docker Image Container
ssh -L <local-port>:127.0.0.1:7000 <username>@<remote-host>
In a browser on your local device, navigate to http://127.0.0.1:<local-port> to access the Caido GUI.
Exposing an Instance to the Internet
Alternatively, you can serve the Caido GUI from a domain. This option is useful for easy collaboration between team members or for sharing instances with clients.
DANGER
By default, Guest Mode is disabled for the Caido CLI. If Guest Mode is enabled, the Caido instance will be publicly accessible without authentication. For security and confidentiality, ensure Guest Mode is disabled and avoid the --allow-guests command-line option when launching the Caido CLI before exposing an instance to the internet.
Nginx Configuration
To logically separate the internet-exposed Caido instance from your existing setup, create a new subdomain (e.g.
caido.example.com) by adding an A record for the IP address of your server.SSH into your server.
Create a new
sites-availablefile for the domain and use theproxy_passdirective to route traffic to Caido:
sudo nano /etc/nginx/sites-available/caido.example.comserver {
server_name caido.example.com;
location / {
proxy_pass http://127.0.0.1:8081;
proxy_set_header Host $host;
proxy_set_header X-Real-IP $remote_addr;
proxy_set_header X-Forwarded-For $proxy_add_x_forwarded_for;
proxy_set_header X-Forwarded-Proto $scheme;
proxy_set_header Upgrade $http_upgrade;
proxy_set_header Connection "upgrade";
proxy_http_version 1.1;
}
listen 80;
listen [::]:80;
}- Make the site available, test the configuration, and reload the web server:
sudo ln -s /etc/nginx/sites-available/caido.example.com /etc/nginx/sites-enabled/sudo nginx -tsudo systemctl reload nginx- Obtain an SSL/TLS certificate:
sudo certbot --nginx -d caido.example.com- Launch the Caido CLI:
./caido-cli --ui-listen 127.0.0.1:8081 --proxy-listen 127.0.0.1:8082 --ui-domain caido.example.com --debug --no-renderer-sandbox --no-open- Navigate to the domain specified by
--ui-domainto access the Caido GUI.
Docker & Traefik Configuration
Caido can also be served from a domain with Docker and Traefik.
NOTE
Ensure to replace user with your username, caido.example.com with your domain, user@example.com with your email address, and account for any currently running processes by changing the ports.
SSH into your server.
Create a
docker-compose.ymlfile with the following content:
services:
  caido:
    image: caido/caido:0.55.3
    container_name: caido
    ports:
      - "127.0.0.1:8082:8082"
    volumes:
      - /home/user/caido/data/:/home/caido/.local/share/caido
    command: >
      caido-cli
      --no-renderer-sandbox
      --debug
      --no-open
      --ui-listen 0.0.0.0:8080
      --ui-domain caido.example.com
      --proxy-listen 0.0.0.0:8082
    restart: unless-stopped
    labels:
      - "traefik.enable=true"
      - "traefik.http.routers.caido.rule=Host(`caido.example.com`)"
      - "traefik.http.routers.caido.entrypoints=websecure"
      - "traefik.http.routers.caido.tls.certresolver=letsencrypt"
      - "traefik.http.services.caido.loadbalancer.server.port=8080"

  traefik:
    image: traefik:v3.6
    container_name: traefik
    restart: unless-stopped
    ports:
      - "80:80"        # HTTP
      - "443:443"      # HTTPS / TLS termination
    command:
      - "--providers.docker=true"
      - "--providers.docker.exposedbydefault=false"
      - "--entrypoints.web.address=:80"
      - "--entrypoints.websecure.address=:443"

      # Redirect HTTP → HTTPS
      - "--entrypoints.web.http.redirections.entrypoint.to=websecure"
      - "--entrypoints.web.http.redirections.entrypoint.scheme=https"

      # Let’s Encrypt
      - "--certificatesresolvers.letsencrypt.acme.tlschallenge=true"
      - "--certificatesresolvers.letsencrypt.acme.email=user@example.com"
      - "--certificatesresolvers.letsencrypt.acme.storage=/letsencrypt/acme.json"

    volumes:
      - /var/run/docker.sock:/var/run/docker.sock:ro
- ./letsencrypt:/letsencrypt- Create a data storage location for Caido (e.g.
/home/user/caido/data):
mkdir -p /home/user/caido/data- Grant ownership of the directory to the
caidouser:
sudo chown -R 996:996 /home/user/caido/data- Make the directory writable:
sudo chmod -R 777 /home/user/caido/dataNOTE
If Nginx is running, kill the process before continuing:
sudo systemctl stop nginx- Then, run the container to launch Caido:
sudo docker compose up- Navigate to the domain specified by
--ui-domainto access the Caido GUI.
NOTE
If you encounter authorization errors, click on the account button in the top-right corner of the Caido user-interface and select Logout to reauthenticate.
Creating Remote Instances from the Desktop Application
Once the Caido CLI is running and the domain is accessible, additional instances can be created via the launch window of the desktop application. This allows you to use the desktop application to create and manage instances on the remote server.
To create a new instance:
Open the launch window and click on the
New instancebutton.Select the
Remotetab, name the instance, specify the domain name and port, and click on theCreatebutton.
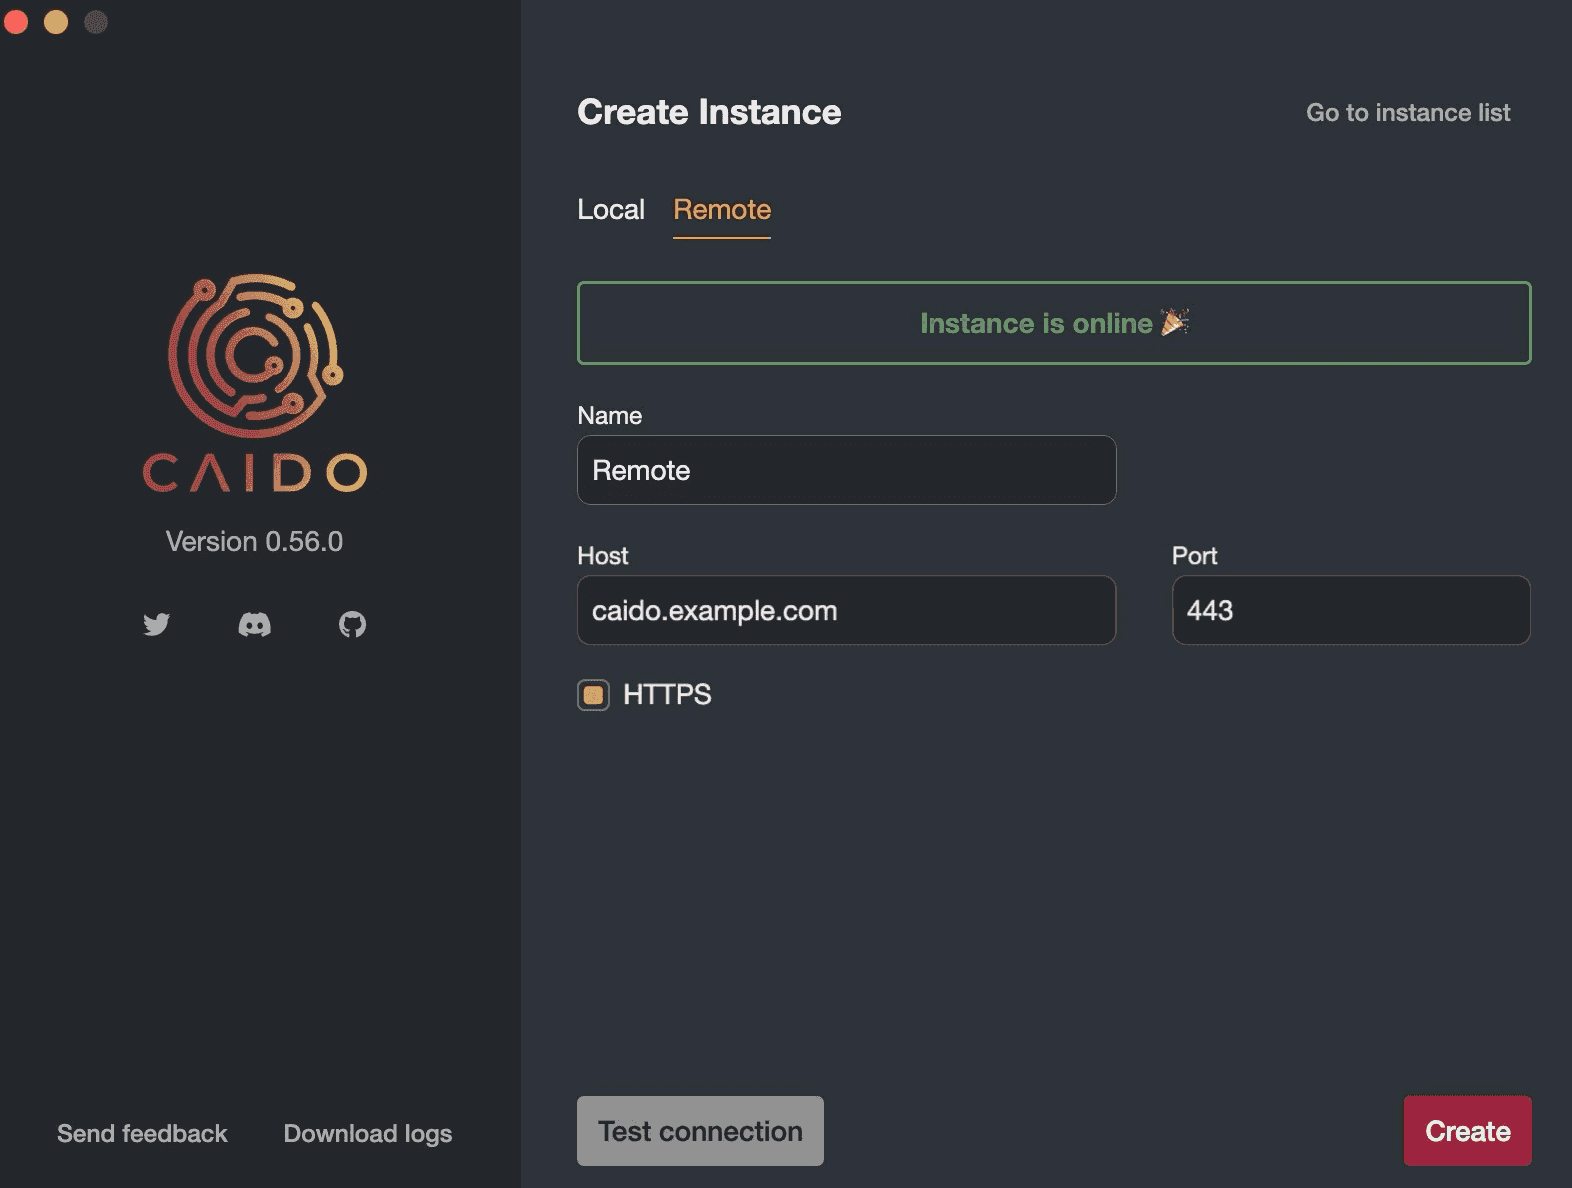
Once authenticated, the remote instance GUI will be available via the desktop application.
TIP
To automate headless Caido instances via scripting, view the Orchestrating Caido Headless tutorial.