Using Caido in GitHub Actions
This tutorial will guide you through setting up and using Caido in a GitHub Actions CI/CD pipeline. You'll learn how to:
- Set up a headless Caido instance in GitHub Actions
- Configure secrets for secure authentication
- Create scripts to interact with your Caido instance
⚡PAID FEATURE
This tutorial requires a Caido Teams plan for registration key support.
1. Creating a Registration Key
To safely deploy Caido instances in automated environments without human intervention, you'll need to use a Registration Key. Registration keys automatically claim new instances, ensuring they're secure even when deployed in CI/CD pipelines.
Creating a Registration Key
First, create a registration key in the Caido Dashboard:
- Navigate to your
Teamworkspace - Go to the Registration Keys section
- Click
Create Key - Configure the key:
- Description:
CI/CD Pipeline - Prefix:
cicd(or your preferred prefix) - Expiration: Set an expiration date appropriate for your use case
- Reusable: Yes (recommended for CI/CD)
- Description:
For detailed instructions, see our guide on creating a registration key.
2. Creating a Personal Access Token (PAT)
To authenticate your scripts with the Caido instance, you'll need a Personal Access Token (PAT). PATs allow headless authentication without requiring browser interaction.
Creating a PAT
- Visit the Caido Dashboard
- Navigate to the Developer page in your Workspace
- Click
+ Create Token - Configure the token:
- Name:
CI/CD Automation - Resource Owner: Select your
Team - Expiration: Set an expiration date
- Name:
For detailed instructions, see our guide on creating a PAT.
3. Configuring GitHub Secrets
To securely store your registration key and PAT, you'll need to add them as GitHub repository secrets. This ensures they're encrypted and only accessible to your GitHub Actions workflows.
Adding Secrets to Your Repository
Navigate to your GitHub repository
Go to Settings → Secrets and variables → Actions
Click New repository secret
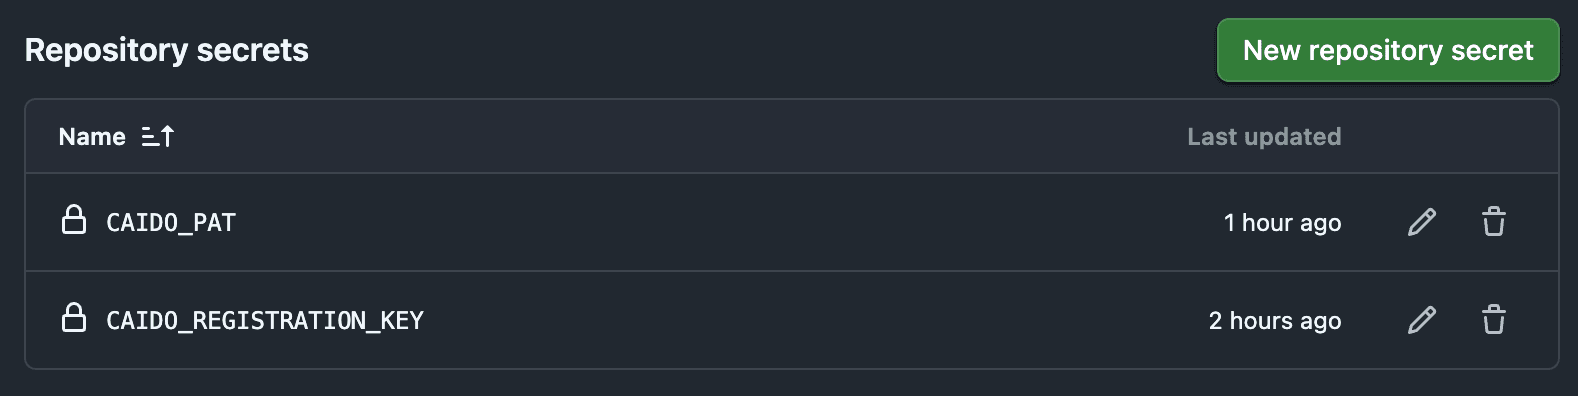
Add the following secrets:
Name:
CAIDO_REGISTRATION_KEY- Value: Your registration key (e.g.,
ckey_xxxxx)
- Value: Your registration key (e.g.,
Name:
CAIDO_PAT- Value: Your Personal Access Token (e.g.,
caido_xxxxx)
- Value: Your Personal Access Token (e.g.,
WARNING
Never commit secrets directly in your code or workflow files. Always use GitHub Secrets for sensitive information.
4. Creating the Automation Script
Now we'll create a script that uses the @caido/sdk-client to interact with your Caido instance. This script will demonstrate common CI/CD use cases like creating projects, running scans, and checking results.
Setting Up the Project
First, create a directory for your automation scripts and initialize it:
mkdir script
cd script
pnpm init
Install the Caido SDK client:
pnpm install @caido/sdk-clientThe Automation Script
Create a file named index.ts:
import { Client } from "@caido/sdk-client";

async function main() {
  // Get the Caido instance URL from environment or use default
  const instanceUrl =
    process.env["CAIDO_INSTANCE_URL"] ?? "http://localhost:8080";

  // Get the Personal Access Token from environment
  const pat = process.env["CAIDO_PAT"];
  if (pat === undefined || pat === "") {
    console.error("❌ Error: CAIDO_PAT environment variable is required");
    console.error("   Set it with: export CAIDO_PAT=caido_xxxxx");
    process.exit(1);
  }

  const client = new Client({
    url: instanceUrl,
    auth: {
      pat: pat,
      cache: {
        file: ".secrets.json",
      },
    },
  });

  await client.connect();
  console.log("✅ Connected to Caido instance");

  const viewer = await client.user.viewer();
  console.log("Viewer: ", JSON.stringify(viewer, null, 2));
}

main().catch((error: unknown) => {
  console.error("❌ Fatal error:", error);
  process.exit(1);
});
Adding Scripts to package.json
Add the following to your package.json:
{
  "scripts": {
    "test": "node index.ts"
  },
  "devDependencies": {
    "@types/node": "^20.0.0",
    "typescript": "^5.3.0"
  }
}
5. Creating the GitHub Actions Workflow
Now we'll create a GitHub Actions workflow that sets up Caido and runs your automation script.
Workflow File
Create .github/workflows/caido-tests.yml:
name: Run Caido Security Scan
on:
  push:
    branches:
      - 'main'

jobs:
  scan:
    runs-on: ubuntu-latest

    services:
      caido:
        image: caido/caido:latest
        ports:
          - 8080:8080
        env:
          CAIDO_REGISTRATION_KEY: ${{ secrets.CAIDO_REGISTRATION_KEY }}

    steps:
      - name: Checkout Repo
        uses: actions/checkout@v6

      - name: Set up Node
        uses: actions/setup-node@v6
        with:
          node-version: '24'

      - name: Install pnpm
        uses: pnpm/action-setup@v4
        with:
          version: 10

      - name: Install script dependencies
        working-directory: script
        run: pnpm install

      - name: Run script
        working-directory: script
        run: pnpm start
        env:
          CAIDO_PAT: ${{ secrets.CAIDO_PAT }}
          CAIDO_INSTANCE_URL: http://localhost:8080
6. Customizing for Your Use Case
You can extend this setup for various security testing scenarios:
Create an OOB link
// Execute a workflow
const pluginPackage = await client.plugin.pluginPackage("quickssrf");
if (pluginPackage === undefined) {
  console.error("❌ Error: Plugin package not found");
  process.exit(1);
}

const settings = await pluginPackage.callFunction<QuickSSRFSettings>({
  name: "getSettings",
});

await pluginPackage.callFunction({
  name: "startInteractsh",
  arguments: [
    {
      serverURL: settings.serverURL,
      token: settings.token,
      pollingInterval: settings.pollingInterval,
      correlationIdLength: settings.correlationIdLength,
      correlationIdNonceLength: settings.correlationIdNonceLength,
    },
  ],
});

const result = await pluginPackage.callFunction<GenerateUrlResult>({
  name: "generateInteractshUrl",
  arguments: [settings.serverURL],
});
Running Scans
INFO
Will be added soon
Next Steps
For a complete working example, check out the caido-community/cicd-example repository.